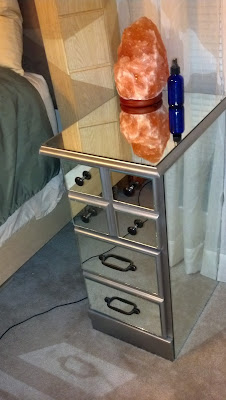
I'll start by saying that I made a lot of mistakes that you won't have to!
This was a project that had a steep learning curve, and I'll put in bright red bold colors all the things I didn't do, but should have!
You will need:
- Nightstand-type furniture (avoid anything with curves or rounded detailing, such as French country)It should have the handles already on it, or buy new handles to match your look.
- Mirrors cut to size - if you have any scraps left over, take them too. You'll need something to practice on. You can get mirrors and have them cut to size for free at Lowe's.
- Sander
I already had the sander and the jigsaw, so this project only cost me about $80 for everything.
I actually went on Craigslist and found a cheap desk that I could cut in half for two nightstands. It was $20, used. It was scratched up, but it didn't really matter since I'm putting mirrors over everything,
Use a jigsaw, and cut it evenly in half. I would have beveled the cut edge, but I didn't have a router.. If you have a router, you will want to bevel the cut edge so it looks good.
In retrospect, the overhang on the tables was a little too long, so I'd trim that a little better.
I took the handles off the drawers, and sanded the drawer faces.
I then spray painted the nightstands and drawers at the seams and corners. I used a shiny silver spray paint, but you could use any sort of cool color for an accent!
You will need to measure every surface that you will want your mirrors on.
Go to Lowes, and go to the Glass Cutting section for your mirrors. Get an employee to cut all your mirrors to the sizes you want. They will have razor sharp edges, so be careful!!
 |
| Max joined me for my mirror excursion |
When I got home, I sanded the sharp edges of each mirror. This is the worst part. It took so much time.
THIS IS IMPORTANT: Lay your mirror face up on an old beach towel before you sand the edges. Sand it, just enough to make the sharp edges less razor sharp.
 |
| (Internet picture) |
I sanded my mirror on my workbench without a towel, and the shaking of the sander caused the backs of my mirrors to get all scratched up on the rough workbench, and these scratches showed through the mirrors. My mirrors look like they have fine, jiggly pencil lines in them now.
ALWAYS WEAR A RESPIRATOR WHEN SANDING GLASS. You could inhale fine glass dust and you don't want that stuff in your lungs. Wear eye protection
 too. If anything you get any of this dust in your eyes, you could scratch your cornea and destroy your eye.
Do not let the other mirrors rest on the same surface you are sanding. The motion of the sander will vibrate the workbench and your mirrors will slide off. It happened to me and one broke! Store them on the ground or somewhere besides your work surface.
Once sanded, it's time to glue them to your nightstand!
Degrease the back of your mirrors well (windex or ammonia work fine), and also wipe down the nightstand.
Then glue the mirrors on with your construction adhesive:
 |
| This pic is from the internet. When I did these, I forgot to take pics, so I don't have a ton of pics for this one. |
Press and hold your mirrors on for a good few minutes per mirror, so nothing slides while the adhesive dries.
Let the adhesive completely dry the recommended amount of time before the next step.
Let the adhesive completely dry the recommended amount of time before the next step.
Next I drilled holes for drawer handles. I drilled from the back of the drawers. I first drilled through the wood with a regular bit, then when that bit rreached the glass, I used the special glass drill bit.
Good how-to here: How to drill holes through glass
Wear a respirator/eye protection for this too.
**Put a towel under the mirror when you drill it - or you'll get scratch marks!
**Put a towel under the mirror when you drill it - or you'll get scratch marks!
Good how-to here: How to drill holes through glass
I needed to practice on some of my mirror scraps first.
I attached the handles to the drawers - I needed to buy longer screws than what was provided withmy handles. The mirrors added just enough thickness that I needed longer screws.
I'd also recommend having some felt between the knobs and the mirrors... if you close the drawers swiftly or with any force, it could crack the mirror.
I wiped down the nightstands, and put them on display!
 |
| You can see my un-beveled edge on the right ledge there... |
And there you are!
I don't think that these were big enough for the scale of our bed, but I love the mirrored look.
What would I do differently?
1. Get bigger nightstands.
2. Bevel the cut edges
3. Put a towel underneath the glass as I was sanding and drilling.
4. Put some felt between mirrors and handles. There are a few spidery cracks growing out of one of my handles (it's been 4 months) and I think felt would have saved it.
I love how I got TWO mirrored nightstands for $80, when these things easily cost $170 each, if not more!


