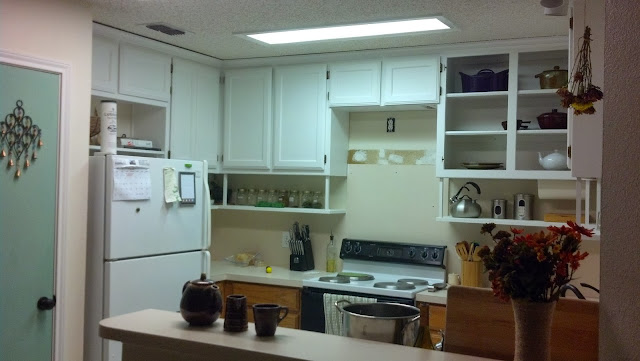
Here's where I left off in my previous half-makeover: cabinets have been raised to the ceiling, the shelves under the cabinets have been built, and now everything needs some painting!
To start, I took off all my cabinet doors and hardware. I laid out the cabinet doors as they were in my kitchen (this way you won't have to number them or keep track of which is which.) A door will only fit on its own cabinet, there can't be any mix and match.
Hardware can be mix and matched though.
Now, the sanding. Yes, sanding sucks... it's absolutely WORTH IT to get an electrical sander. Don't even try to do this by hand. I used coarse (80 grit) sandpaper for everything.
Since sawdust will get everywhere, and you don't want to have to vacuum your couches or wash every dish in the cabinet when you're done, I took everything out of the cabinets and used big blankets and sheets to cover everything:the couches and the piles of kitchen stuff on the floor. When you're done sanding, let the dust settle, then just wash the blankets! Sure beats dust in everything.
I decided I wanted one open cabinet, so I sanded the inside of that cabinet. I did the tops and bottoms of the shelves, the sides, bottom and top of the box, and the fronts of the shelves. The inside of cabinets is also usually glossy.
To hide the oak finish, I did one coat of high hiding primer in white (by Valspar), and two light topcoats of my color ("arctic white" by Olympic). A nice little trim roller was perfect for the job!
You don't need some fancy "kitchen and bathroom" paint. As long as you get a glossy paint, that is fine. I have a satin gloss here. The higher the gloss, the easier it is to wipe clean.
Let everything cure as long as you can stand it. I only waited overnight, because the house was such a wreck that Dear Husband was going crazy...
If you can wait longer for the paint to cure, you won't have any problem with doors sticking.
I haven't done the bottoms yet, I think I'll do them a different color :-).
So, I put my doors back on...
I haven't put the microwave back above the stove yet. I really want a nice vented range hood.
So I know that I want one of those range hoods with glass edges, so that more light can come in and bounce around.
UPDATE: did that a while later! Here is my tutorial on changing a vent hood from recirculating air to ducting to the outside!
UPDATE: did that a while later! Here is my tutorial on changing a vent hood from recirculating air to ducting to the outside!
BY THE WAY, it wasn't until after I raised the cabinets and removed the microwave that I realized how much more well lit my cooktop is!!
Finished with the uppers!
 |
| Sorry about the microwave hole... |
Here's some close ups... I love herbs and gardening, so I have a shelf of herbs and herb accessories:
The other side - cups, mugs, and tea/coffee accessories.
I have white shelf liner cut to fit on all these shelves.
There's still a big hole where the microwave was; as soon as I can afford a ducted vent, I'll install and post pics!
It will be a DIY on how to duct a vent to the outside (through the roof). Range vents don't do any good unless they duct to the outside. Filters are no good for smells, and minimally good for grease.
Here's what I want - I'm only $100 short of my goal!
(It's on Amazon - picture linked))
Here is a picture of my kitchen with the raised and painted upper cabinets, and the new vent hood installed:
Here is a picture of my kitchen with the raised and painted upper cabinets, and the new vent hood installed:


